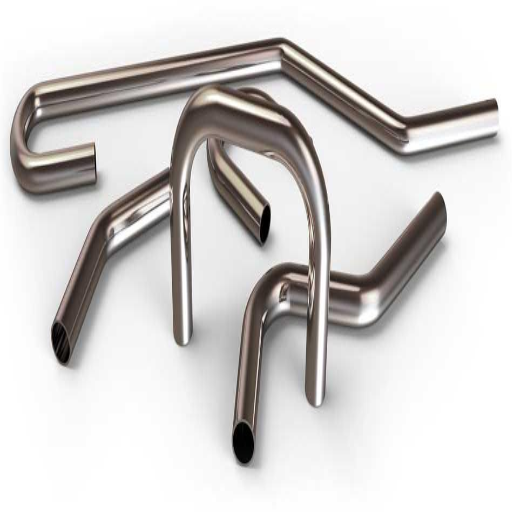
Whether you do it as a hobby or on a more professional level, bending aluminum tubing is a vital skill for dealing with furniture, automotive repair, and other designs that involve customizing. Achieving smooth curves without kinks is critical, as they may be unsightly and unwanted. This guide will show you how to prepare, equip, and use techniques to achieve perfect results.
Start by looking up the geometry of aluminum tubing. We will look into its basic properties, meaning its use and versatility in different applications. After that, we will examine the most essential tools and the enlargement techniques you need to ensure you pick the proper aluminum tubing for your project. We will also include, but will not be limited to, steps on how to bend tubing without damaging it, avoiding kinks, deformations, and other common regrets that make your work harder than it is supposed to be. Lastly, we will add some advanced additional tips to finish the project. You will now be prepared and know how to bend tubes without worrying about the aesthetic results.
What tools do I need for bending aluminum tubing?

To bend aluminum tubing effectively, you will need the following suggested tools:
- Tube Bender: a manual or hydraulic tube bender, two-in-one of sorts. This will guarantee precise bends while ensuring the tubing will not be harmed.
- Measuring Tools: A tape measure or ruler aids in accurately marking the angles and lengths.
- Marker or Scribe: Tubing bending requires markers, such as scribes or markers, to indicate the bend and alignment points.
- Vise: Any sturdy vise can hold the tubing in place during the bending phase.
- Heat Gun (optional): Overheating the tubing can be very advantageous, particularly for more brittle tubing, like thicker aluminum, where the potential for cracking could be an issue.
- Protective Gear: Gloves and goggles protect the user while undertaking the task so that you can work comfortably.
These tools will help you achieve accurate and professional results in your aluminum tubing projects.
Essential tube benders for different aluminum alloys
Choosing a tube bender that will not kink or damage the material geometry when working with various aluminum alloys is imperative. After conducting my studies, I believe the following primary tube bender types will meet your requirements:
- Mandrel Tube Benders: They are perfect for softer aluminum alloys like 3003 and 5052 since they maintain smooth bend radii and prevent wrinkling. They are very effective on thin-walled tubing.
- Rotary Draw Benders are adaptable and work perfectly on more complex alloys like 6061. They are consistent performers on tight bends while ensuring the tubing is not compromised.
- Roll Benders are mainly used for large-radius bends. They work well with most aluminum alloys and in cases where precision is not as critical, like architectural or decorative projects.
Appropriate selection of tube bender aligned with the aluminum alloy results in higher quality outcomes due to reduced stress fractures or imperfections.
Clamps and mandrels to prevent tubing from collapsing
When bending operations on aluminum tubing, clamps, and mandrels are essential to maintain the shape of the tubing and prevent collapse. A clamp die locks the tubing to avoid undesired bending motion, helping minimize movement and deformation. Mandrels, which are placed within the tubing, aid in preserving the cross-section of the tubing, especially in tighter bends, by supporting the interior.
Types of Mandrels:
- Plug Mandrel: This is the easiest to understand. It is used for light bends with a low level of internal support.
- Ball Mandrel without Links: Used for modern support and bends with larger radii.
- Ball Mandrel with Links has the best flexibility. It is made for close radius bends because it permits bending while fitting closely to the tubing’s inside contour.
- Formed Mandrel: Used for very specialized shaped tubing beyond standard round profiles.
Aspects to Consider:
- Wall Thickness: Mandrel thinner than 0.035’’ needs more support to prevent wrinkling or collapse.
- Bend Radius: A mandrel with a link is more effective for tight bends (bends with a radius of less than three times the tubing diameter).
- Material Composition: Softer alloys like 3003 or 6061-T6 might need extra support, or else they’ll break or tear.
With the correct choice of clamps combined with the right clamp and tooling adjustments, bends on aluminum tubings can be done with incredible smoothness and high accuracy.
Measuring tools for achieving precise bend radius
To obtain the desired bend radius, I employ an intricate set of measuring instruments and parameters that provide clear-cut instructions to achieve the required bend radius. A protractor or digital angle finder is essential since it enables me to achieve the desired bending angle precisely. Moreover, I double-check the internal bend radius using a radius gauge. A caliper also aids in propelling consistency by measuring the tubing dimensions pre and post-bending.
Key aspects I consider include the following:
- Bend radius tolerance: The range-specific most applications revolve around ±0.5 mm.
- Wall thickness consistency: I keep the wall deformation within a limit of 10% during bending.
- Springback allowance: To account for the springback adjustment, I add 2-5 degrees from the original bend for a specific aluminum alloy.
From these tools and parameters, I can achieve accurate bend radii that are functional and precise.
How do different methods for bending aluminum tubing compare?

Different approaches to bending aluminum tubing, such as rotary draw bending, roll bending, and compression bending, have pros and cons. For example, Rotary draw bending is ideal for tight radii and applications that require high accuracy because of its precision and consistent bends. Unlike roll bending, which is more suited for creating large radius bends and is often used in structural applications, compression bending is a straightforward method typically used in less critical applications that do not require high precision. The choice of method depends on the bend radius, properties of the material, and the application.
Using a hydraulic tube bender for professional results
Using a hydraulic tube bender has been a game changer in the quality and precision of my projects. I choose the correct dies for the tube size and material to achieve a professional result. I follow the machine’s operating instructions, ensuring I do not overload the material while achieving the desired angle. Regular maintenance of the bender, such as cleaning and lubricating moving parts, is paramount in preserving its accuracy and performance. By understanding the tool and following the best practices, I’ve achieved consistent, high-quality bends tailored to my needs.
DIY bending with a pipe bender for round tube applications
When it comes to accurately bending round tubes with a pipe bender, there are several steps and considerations to take into account to avoid damage to the material:
- Choose the Right Pipe Bender and Die Size
Make sure that the bender fits the tube’s material and diameter. For example, the die’s radius must match the set bend specifications. Standard sizes tend to be between ½ inch to 2 inches.
- Determine the Material’s Bend Radius and Thickness
Bent tubes or pipes’ materials and wall thickness significantly affect their flexing ability. A 1.5 mm wall-thickness steel tube may yield a minimum bend radius of three times its outer diameter to avoid kinking or flattening.
- Using a Mandrel for Thin-Walled Tubing
If you are working with thin-walled round tubes, consider using a mandrel to hold the tube’s internal structure as it is bent to prevent distortion.
- Mark and Measure Accurately
Use a marker to show the start and stop points for bending. Recheck the measurements to guarantee they match your project requirements.
- Set Proper Bender Pressure
Modify the bender pressure according to the material. Too much pressure may crack the material, while too little pressure will not bend the pipe entirely. Softer metals such as Aluminum require less pressure than Stainless steel.
- Slow and Controlled Bending
Increase the pipe’s angle slowly until you reach the desired angle. Make minor adjustments for precise angles to avoid complete rotations.
- Aspects for Common Materials
- Steel Tube: Bend radius = 3× OD, Wall thickness ≥ 1.5 mm.
Aluminum Tube: Bend radius = 4× OD, Wall thickness ≥ 2 mm (lubrication recommended).
Copper Tube: Bend radius = 2.5× OD, Wall thickness ≥ 1 mm.
- Post-Bend Inspection
After completing the bend, check the pipe for visible surface cracks. Confirm addressable angle requirement according to protractor/angle gauges.
These guides and approaches help achieve professional class results with the pipe bender, even with DIY round tube projects.
Cold bending vs. heat-assisted bending techniques
Cold bending and heat-assisted bending differ in the techniques employed and the treatment of the material during the procedure. My preference is cold bending, and that’s because of the straightforward processes involved during the fabrication of parts made from steel and aluminum that have suitable tolerances, radii, and ductility—conditions that allow for bending. The preferred technique is defined by the absence of heating, thus mechanical cold force is applied to ductile materials using temperature shafts with high ductility. For instance, the method suggests guidelines of not less than three times the OD of a steel cylinder when using composite-like structural steel to avert cracks or distortions.
Then, it would be classified as heat-assisted bending if the material is pre-heated to a temperature range where it loses form retaining strength before the bending process to avoid fractures or stress. For example, with copper tube bending, one would apply a temperature of approximately 500 to 600 drill Fahrenheit, 260 to to316 centigrade, to make it softer. The approach is far more dangerous due to the complexity involved, but more pre-bend radius angle carving masters triggering material fracture tend to colder temperatures. Each method has its merits, but the choice depends entirely on the project needs, the material’s essential factors, and mechanical properties.
What are the challenges of bending aluminum square tubing?
The problems encountered while bending an aluminum square tube are primarily due to its cracking and deforming under pressure. Smith (2023) states aluminum has lower ductility than steel; positioning it as a more prone material to damage during bending makes the task more challenging. It takes a careful balance of factors like bend radius, wall thickness, and tooling to achieve precise bends without affecting the strength of the structure. Depending on the alloy, aluminum requires heat treatment and/or annealing to lower the brittleness, complicating the process.
Preventing walls from collapsing during the bending process
Bending procedures are more challenging when retaining the shape of the walls. Preventing the walls from collapsing requires multiple steps. First, I ensure the ratio of the bend radius is appropriate. Providing support helps, too; mandrels and other tools serve as structural supports to fill the void and steer clear of collapse. In addition to those, I maintain the trust of lubricants; reducing friction allows even pressure to be applied without risking the integrity of the walls. Those working with aluminum need to alter it; annealing and pre-heating lowers brittleness and increase pliability. These steps allow for the accomplishment of clean and precise bends while retaining the structure needed for the materials.
Achieving tight radius bends with square tube profiles
Accomplishing a close radius bend on square tubing is often quite demanding as it requires attention to accuracy since square profiles are more susceptible to deformation or wrinkling when bending is performed. Several risks such as these can be tackled using different techniques and considerations:
- Choose the Right Equipment
Rotary draw benders and mandrel benders need to be utilized since these machines offer the control required for square tubing. A distortion-preventing die with an internal mandrel can also assist in sustaining foreman integrity. Ensure all tools are tailored to the measurements of your square tube, especially for tight radius bender tools.
- Minimum Bend Radius Guidelines
Depending on the thickness of the tube wall and the material used, the minimum radius of a bend also changes. A rough estimate dictates that the radius should not exceed two to three times the tube’s outer diameter (OD). Using the example of:
-
-
- 1-inch square tubes with 0.065-inch wall thickness. The above example shows that at least two to three inches is the expected lower limit of the tube bend radius.
- With higher wall thickness, better results are achieved for tighter radius without collapsing the tube.
-
- Prevent Wrinkling and Deformation
Undo creasing with a wiper die to reduce inside bend wrinkling, which provides better control.
Incorporate internal supports such as sand or resin fills for added stability.
Ensure constant tension is maintained to avoid uneven stress distributions during bending.
- Material Considerations
Add softer materials, such as aluminum or annealed steel, as they are more pliable and suitable for tighter bends. More difficult materials like stainless steel may need further heat treatment to soften them and reduce their brittleness, making them more flexible.
- Lubrication and Speed
Proper lubrication is critical as it minimizes friction and enhances smooth bending. Furthermore, consistency in feed rate and bending speed should be maintained—some radius tightening may necessitate moving more slowly and with greater control to prevent mistakes.
Following these guidelines and using suitable tools and techniques will enable accurate, high-quality, tight-radius bends on square tube profiles without compromising their structural integrity.
Solutions for 90-degree bends in aluminum square tubing.
Tight, accurate 90-degree angles in aluminum square tubing can be achieved using the proper approach and appropriate equipment. I suggest a mandrel or tubing bender, as they are best suited to prevent crimping or collapsing the material. If the tubing is preheated to be more ductile and within tensile strength limits, the risk of cracking will also be reduced. Best results occur when the bend radius approaches or exceeds the outer diameter of the tube’s circumference (OD) by a factor of 1.5; this maintains structural integrity and optimizes the chances of success. Furthermore, using filler materials such as sand provides extra internal reinforcement during the bending process for walls of thinner material.
Aspects to consider:
- Bend Radius: Minimum 1.5x the tube’s OD to avoid deformation.
- Wall Thickness: Thinner walls may need internal supports, while thicker walls may not.
- Material Condition: Tempered aluminum, such as T6, may need pre-heating or annealing to prevent crack formation.
- Bending Speed: Minimized structural damage occurs when bending slowly and uniformly.
Professional-level 90-degree bends in aluminum square tubing are achievable when following these principles.
What are common problems with bending aluminum tubing, and what are their solutions?
- Cracking or Splitting: This is especially true for the tempered form of aluminum, as its crack susceptibility increases with brittleness. Solution: Collapse bending techniques by adequate pre-heating or annealing to avoid cracking risks.
- Flattening of the Tubing: The tube can also lose its circular or square cross-section during bending. Solution: Employ an internal mandrel or sand to fill the hollow portions of the tubing to maintain the cross-sectional shape and avoid deformation.
- Springback: The bend angle may also become less than intended because the tube can rotate slightly back tangentially to the radius of the bend. Solution: Apply additional pre-wind on the spring back using a more elastic material or consider geometry with less elasticity.
- Wrinkling on the Inner Bend Radius: Ahigh bending compressive force within the inner radius may result in wrinkling. Solution: Ensure constant compressive force throughout the bend and use dies with appropriate tool radius.
If these common problems are resolved using the correct approaches, techniques, and tools, high-quality bends can be achieved without damaging aluminum tubing’s structural rigidity.
Preventing kinks and wrinkles when you bend the tube
I focus on a few techniques to avoid the kinks and wrinkles that often emerge when bending aluminum tubing. First, I always consider the proper tooling and support. For example, mandrels or dies with radii appropriate for the tube’s size and material type must be met. Pressure during the bending process must always be consistent so as not to cause uneven deformation. I also selected the best grade of tubing, which has uniform wall thickness and cross-section, as this minimizes the chances of tubular sections with low axial strength, which may cause kinks or wrinkles. Furthermore, the lubrication of the tubing aids in reducing the amount of effort required for bending, thus reducing the amount of friction and resistance and making the process much smoother. These methods render me great bends with precision while preserving the structure’s integrity.
Fixing uneven bends and maintaining consistent diameter
To help solve the issue of wrinkled bends while retaining a fixed tubing diameter, perform the following procedures:
- Use Proper Tools: The right type of tool must also be used. Spend some additional cash on quality bending tools, such as rotary draw benders and mandrel tube benders, as they control the bending angle better due to providing resistance, which removes the chance of kinking.
- Preheat Metal Tubing (If Applicable): Softening metals such as copper and steel involves the gentle application of an external heat source. This enables the bending of the said materials without suffering any geometrical imperfections. The temperature should never surpass the material’s working limit to maintain the structure’s stiffness.
- Apply Correct Bend Radius:
-
-
- Always adhere to the specific minimum bend radius criteria associated with the material and tubing size. As an illustration:
- Steel Tubing (mild steel, 1″ diameter): The minimum bend radius is 3-4 times the outer diameter.
- Aluminum Tubing (1″ diameter): Minimum bend radius equals 5 times the outer diameter.
- Using a larger bend radius minimizes deformation and assists in sustaining a consistent diameter.
- Always adhere to the specific minimum bend radius criteria associated with the material and tubing size. As an illustration:
-
- Use a Mandrel Support:
-
-
- Use an internal mandrel support to preserve the internal diameter of the tube, particularly with thin-walled tubing or tight radii. This prevents collapse and wrinkling.
-
- Check Wall Thickness:
-
-
- Check that the tubing’s wall thickness is constant about the bending axis. Inconsistencies can cause undesired results. First, use calipers to test the thickness.
-
- Bending Speed:
-
-
- Constantly shift slowly and gently to avoid excessive force. Apply even pressure throughout the bending stage, as rapid bending creates stress points and deformations.
-
- Lubrication:
-
-
- Use an appropriate lubricant to minimize friction between the tubing and the die. This promotes resistance-free movement and permits a free-flowing shape.
-
Adopting the practices outlined in this guide while following the required specifications for each material will enable accurate structural bends without the risk of weakening the components.
Dealing with spring back in aluminum tubing bends
When controlling deformity in aluminum tube bending, I concentrate on the specific strategies to reduce spring back effects. I try to compensate for springback by overbending the tube, which means I go 1-3 degrees more than the required angle. The amount of overbending depends on the alloy used. Softer alloys like 3003 spring back less compared to harder ones like 6061. A second point is that applying a mandrel or any form of internal reinforcement while bending helps accuracy and deformation control. Further, having the correct bend radius is also essential, which is usually 3 times the diameter of the tube’s outer layer, along with the consistent application of force, helps overcome spring back. Adjustments and proper tools reduce the chances of the final bend failing to achieve the intended angle.
How can I bend aluminum tubing without specialized equipment?
If you want to bend aluminum tubing without any specialized tools manually, begin by sealing the ends of the tube after filling it with either sand or water. This prevents the tube from collapsing during the bending process. To guide the tube, use a wooden or metal jig with the desired bend radius. Steady, consistent pressure while bending the tubing with a lever or your hands will yield results. You may need to heat the tubing to help it bend lightly, but you mustn’t overheat the material, as this quickly weakens the structure. The material’s stiffness can be eased with heat, but take your time and be precise to avoid damaging the tubing too much.
Using a sand-filling technique to bend aluminum tubes at home
I will explain how to use the sand-filling approach for bending aluminum tubing at home. First, the sand-filled tube should be cleaned thoroughly and filled with dry sand, ensuring no gaps. Clogs or strong tape should shut both ends so there is no leakage during bending. If necessary, heat the aluminum; however, avoid overheating, which can weaken the material’s structure. A jig or form can guide bending and smooth; even pressure can bend the tube gradually. Sanding will save the tube from scratches and aid in achieving the desired results.
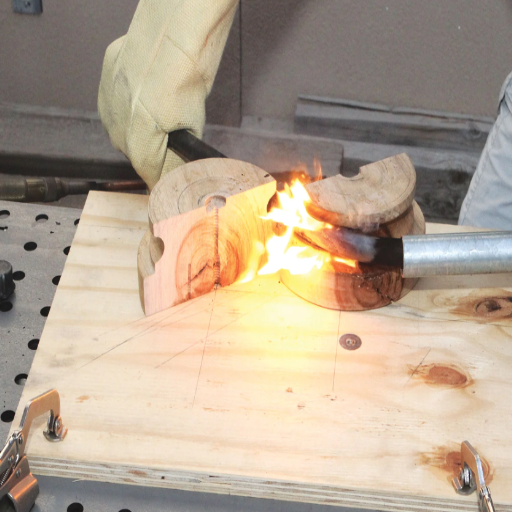
DIY bending jigs you can make with a piece of wood
Making a bending jig with wood is straightforward and is an effective way to shape aluminum tubing at home. I will now provide the needed materials and instructions:
- Materials Needed:
-
-
- A form of sturdy wood like hardwood, with oak or maple preferred.
- Clamps, screws, or nails used for securing the jig.
- Sandpaper to physically prevent marks along the edges and stop rough spots.
- Screw or a router for forming the jig.
-
- Steps to Build the Jig:
-
-
- Design the Jig: Measure and mark the bend radius you wish to achieve on a wooden board. For optimal results without kinking or collapsing, the bend radius should be at least three times the tubing diameter.
- Cut the Channel: With a saw or router, carve a semi-circular U-shaped groove within the curve you marked. This groove is critical for guiding the aluminum tube as it will place it in the required position during the bending procedure.
- Reinforce the Jig: Use sturdy wooden blocks to strengthen the jig. This will keep the tube’s curvature in place, allowing the bend to be accurately executed and retained.
- Secure the Setup: Use screws or clamps to secure the wooden jig onto the workbench. The jig must be immovably fixed if the bending load will be absorbed.
-
- Using the Jig:
-
-
- Clamps or straps can securely bind aluminum tubes. This can be achieved by inserting the tube into the groove and securing one end.
- Make it a priority to ensure optimal uniform pressure when bending the tube around the groove. Heating the tube slightly, not exceeding 300°F (or 150°C), can help reduce the chances of cracking.
- When effortless bends are preferred, the tube can be filled with sand or other materials to preserve the shape.
-
- Aspects to Keep in Mind:
-
-
- Bend Radius: At least 3 times the diameter of the tube. For example, a tube with a diameter of 1 inch should have a minimum bend radius of 3 inches.
- Wall Thickness: Maintain adequate wall thickness to avoid susceptibility to buckling. For standard bends, aluminum tubing should have a wall thickness of 0.035 inches.
- Bending Angle: Indicate the bending angle, e.g., 90 Degrees or 180 Degrees. This indicates how much the jig will be customized.
- Tube Diameter: Ensure that the width of the groove corresponds to the tube diameter so that it fits well.
-
With these guidelines, any bending jig can be constructed economically and effortlessly while accommodating a range of DIY projects.
Step-by-step guide for hand bending small diameter tubing
- Choose the Right Tubing
Step one involves identifying bending-friendly tube materials. Ensure the wall thickness of soft metals like aluminum, copper, and stainless steel supports the desired bend; most small-diameter tubing requires 0.035–0.065 inches. Support thin-walled tubes with bending springs or sand-filled tubing to prevent crimping during bends.
- Mark and Measure the Bend
I marked up the location where the bend would start. Measure the desired bending radius and ensure the technical aspects of the tubing material are met. For small-diameter tubing, the bending radius should be at least 3-5 times the tube diameter to avoid excessive deformation.
- Use a Bending Tool or Mandrel
I combine a handheld tubing bender with a smooth mandrel for the best result. The mandrel needs to be suited to the diameter of the tubing. The tube has to be aligned with the bending groove and immobilized to prevent slipping.
- Apply Steady Force
I ensure the pressure isn’t released by rotating the tubing slowly and steadily. I also check the angle frequently to prevent kinks. Firmness is fundamental when working with softer tubing, and constant pressure should be maintained.
- Check the Final Bend
Adjust the angle or radius where flattening occurs and check after bending. If the tube needs to be smoothed using a round bar or comparable instrument, I will reshape it carefully.
Follow the above suggestions and detailed instructions to bend with perfect accuracy. Smaller diameter tubes will serve very well under custom brackets or hydraulic lines.
References
Frequently Asked Questions (FAQ)
Q: What are the most common tube bending techniques for aluminum?
A: Several techniques are used to bend aluminum tubing, including rotary draw bending, roll bending, compression bending, and mandrel bending. For DIY projects, you might use a conduit bender or pipe bender. Each bending method offers different advantages depending on the tube diameter, wall thickness, and desired radius. Professional fabricators often use hydraulic benders for precision work, especially with large tube diameters or when bending square tubing with minimal distortion.
Q: How can I bend the tubing without it kinking or collapsing?
A: When you bend aluminum tubing, filling the tube with sand or using a spring-type bender prevents kink. The sand provides internal support that helps maintain the tube’s shape. A mandrel inserted inside the tube during bending provides support for thin-walled tubing. Proper lubrication and maintaining consistent pressure throughout the bend also help. Cooling the aluminum slightly before bending can make it less likely to crack, though aluminum is generally more forgiving than steel when cold bending.
Q: Are certain aluminum sections more difficult to bend than others?
A: Certain aluminum sections are more difficult to bend than others. Square and rectangular tubing are typically more challenging to bend than round tubing due to its corners, which can buckle or deform. Thick-walled aluminum is more complex to manipulate but less prone to collapse. Aluminum alloys like 6063 (commonly used in extrusions) offer good bendability, while more complex alloys like 7075 are more difficult to bend without specialized equipment. The specific extrusion profile also impacts bendability—complex profiles with varying wall thicknesses require more technical expertise.
Q: What tools do I need to bend square aluminum tubing?
A: To bend square tubing properly, you’ll need specialized equipment. A hydraulic tube bender designed for square profiles is ideal for professional results. DIY alternatives include a pipe bender with square dies or a roller bender for gentler curves. You’ll also need measuring tools, marking implements, and a tube with sand-filling apparatus. For small projects or thin-walled square tubing, you might be able to bend it by hand with the assistance of a jig, though this method risks distortion. Many fabricators on forums like Chief Delphi recommend investing in proper tooling rather than attempting makeshift methods.
Q: How does the bend radius affect aluminum tubing projects?
A: The bend radius significantly impacts the feasibility and appearance of your aluminum tubing project. A larger bend radius is easier to achieve and puts less stress on the material, reducing the risk of cracking or deformation. The minimum bend radius typically ranges from 2-4 times the tube diameter for round tubing and even more for square tubing. Accounting for the proper bend radius is crucial when planning projects where aesthetics or design considerations are essential. Creating a too-tight bend (a small radius) may require specialized techniques like annealing the aluminum before bending or using a mandrel to hold the tube shape.
Q: Can I create precise degree bends in aluminum tubing at home?
A: With the proper setup, you can create precise degree bends at home. A protractor or angle finder helps measure your degree bend accurately. Create a simple jig marked with standard angles (45, 90 degrees) for consistent results. Digital angle gauges can improve precision. Another approach is using a saw-cut method where you partially cut the tube at specific angles and then bend it. For round tubing, conduit benders often have degree markings. While professional shops use computer-controlled benders for exact replication, careful measurement and practice can help you achieve surprisingly accurate bends with manual tools. Best of luck with your bending projects!
Q: How do the properties of aluminum affect the bending process compared to other metals?
A: Aluminum’s unique properties make its bending behavior quite different from other metals. Aluminum is generally more malleable than steel but less forgiving than copper. It has excellent ductility, meaning you can bend it significantly before failure, but it also works hard quickly during bending. Unlike steel, aluminum doesn’t have a distinct yield point, so it’s more prone to springback (returning slightly toward its original shape after bending). Additionally, aluminum’s excellent corrosion resistance remains intact after bending, unlike some steels that may have compromised protective coatings. This makes aluminum sections particularly useful in outdoor applications where corrosion resistance is required alongside complex forms.
Q: What are typical applications where bent aluminum sections are used?
A: Bent aluminum sections are used in numerous applications across multiple industries. In architecture, they create curved facades, railings, and window frames. Due to its lightweight, the transportation industry uses bent aluminum extensively in vehicle frames, bicycle components, and aircraft structures. Furniture designers appreciate aluminum’s ability to create sleek, modern, curved forms while maintaining strength. In HVAC systems, bent aluminum ducts and conduits are standard. Signage often incorporates bent aluminum profiles for dimensional lettering and frames. Thanks to its corrosion resistance, the marine industry relies on bent aluminum for railings and structural components. Even in DIY and hobby projects, bent aluminum tubing provides an attractive, durable solution for everything from greenhouses to custom bicycle racks.


