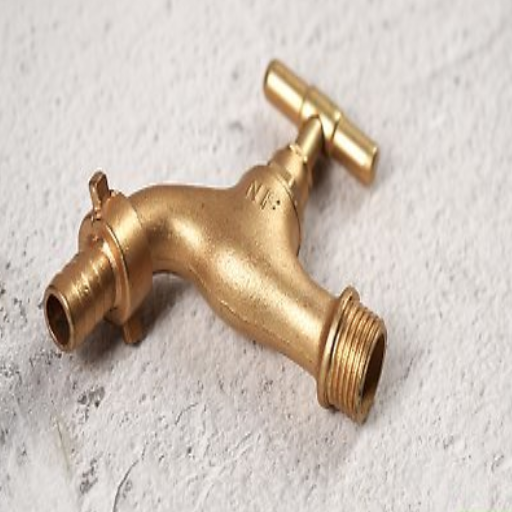
Painting brass might appear to be hard work, but with the correct methods and materials, it becomes a simple means of refreshing and customizing your metal objects. Today, I will take you through every step of painting brass so you can achieve a consistent and long-lasting finish. From preparing the surface of the brass to the right choice of spray paint, applying the paint, adding a durable seal to the piece, and so much more – I will cover it all. Whether you need help restoring outdated hardware, changing the décor of your home, or simply want to dabble in a new DIY endeavor, this guide gives you everything you need. After reading this article, you will know how to change brass into beautifully painted art pieces.
Can You Paint Over Brass?

Of course, you can paint over brass, but it must be done carefully to ensure the paint will last. Brass surfaces should be polished and devoid of dirt and grease. After that, they should also be sanded. Adding a high-quality metal primer before painting the surface is equally as important. Using the correct materials and methods makes it easy to paint over brass while retaining strength and beauty.
Is it Possible to Paint Brass with Spray Paint?
Using spray paint on brass is possible if the surface is cleaned correctly. Painting over brass requires proper cleaning of the surface, light sanding to aid adhesion, application of a primer, and use of appropriate spray paint. For best results, look for spray paint that states adhesion to metal. With metals/wrought iron, proper cleaning aids in achieving the desired finish. There will be no success when attempting to spray paint brass without correct preparation, so the best results stem from ideal preparation.
What Type of Paint Will Adhere to Brass?
Proper paint selection for a brass surface is significant, and not all types are suited for adhesion. Two paints that meet this description and are the most recommended include enamel-based paint and acrylic spray paint. If applied properly, both provide a durable and smooth finish.
- Enamel Paint:
-
-
- It is known for its rugged, glossy finish and excellent durability.
- It Works well on brass, especially when paired with a metal primer.
- Most are Oil-based, which aids in scratches and wear.
-
- Acrylic Spray Paint:
-
-
- Offers a versatile and easy application with smooth, even coverage.
- Look for variations explicitly labeled for metal to ensure proper adhesion.
- It dries quickly, making it handy for time-sensitive projects.
-
Aspects for Best Results:
- Primer: Purchase a good metal primer for better adhesion and corrosion resistance. Allow the primer to dry before applying the paint.
- Surface Preparation:
- Thoroughly clean the brass with a degreasing agent or a mild soap to remove any grease, dirt, or tarnish.
- Use fine-grit sandpaper (approximately 220-320 grit) to lightly sand the area and increase texture for bonier paint capture.
- Paint Application:
- If using spray paint, maintain a constant 8-12 inch gap between the painting surface and the spray can to ensure even coverage.
- Obtain all relevant manuals before use. Be sure to apply new coats only after previously applied ones have thoroughly dried. When using acrylic paint this takes around 15-30 minutes, for enamel the wait time increases.
These techniques, coupled with the correct type of paint, guarantee a professional, long-lasting finish on brass surfaces.
Do You Need a Primer Before Painting Brass?
Similarly, does applying a brass primer facilitate paint adhesion? The use of primers dramatically improves the durability and smoothness of the finish. It is essential to use a primer formulated for metal surfaces, particularly oil-based or self-etching primers. The brass must also be cleaned thoroughly, then vacuum sand with fine sandpaper (220-320 grit) before applying the primer. Wait 1-2 hours for the primer to dry before applying paint; this will ensure that easy peeling will not occur. Following this guide and the steps mentioned assures long-lasting professional results.
How to Prepare Brass for Painting
To prepare brass for painting, first, scrub the surface, clean it, and ensure no dirt, grease, or tarnish. Brass can be sanded lightly using fine-grit sandpaper (220-320 grit) to remove some material and create a texture or scratching that helps the primer adhere better. For best results, use a primer for metal; these could be an oil-based or self-etching primer, each requiring complete drying before applying paint. Completing these steps guarantees the paint has a professional, smooth, and long-lasting finish.
What is the Best Way to Remove Dirt and Tarnish?
The best method for removing dirt and tarnish is to apply warm water and mild dish soap to the brass surface. If the tarnish remains, a paste of equal parts vinegar, salt, and flour can be scrubbed into the brass with a soft cloth. Afterward, it should be rinsed in warm water and thoroughly dried to stop further tarnishing. A commercial cleaner would also do the trick, but care should be taken to follow the provided instructions precisely if deeper cleaning is required.
Should You Scuff the Surface Before Painting?
Before applying paint, almost all materials benefit from surface-level scuffing, also called light sanding. Scuffing creates a rough area that allows the paint to stick more effectively. This step is vital with glossy, smooth surfaces like metal, plastic, or previously painted materials that tend to resist new paint.
To avoid damaging the surface or over-sanding, use fine-grit sandpaper, such as 180 to 220 grit. Make sure you start with a clean surface free from dust and grease. Always wipe the area to be painted with a damp or tack cloth to prevent particles from contaminating the rest of the workspace. If this step is overlooked, it could cause paint to flake off, be unevenly distributed, or create a weak bond, making the finish decay faster than expected. With the proper sanding, you will ensure smoother and longer-lasting paintwork.
How to Use Self-Etching Primer on Brass?
The first step for applying self-etching primer on brass is cleaning the surface using a degreaser or any mild soap. This cleaning gets rid of dirt, grease, or oils. Next, I sand the brass to a fine rough using 220 grit sandpaper. This guarantees better primer adhesion. Then, I wipe the brass surface with a tack cloth to remove dust. I ensure the area is well-ventilated before and during the application of the self-etching primer. I apply the self-etching primer in light, even coats from 8-12 inches away. Per the manufacturer’s guidelines, I let the self-etching primer dry for 15-30 minutes before applying additional coats. Finally, I allow the primer to completely cure before proceeding with the paint or finish, ensuring a professional result.
What is the Best Spray Paint for Brass?

When purchasing spray paint for brass, ensure that you pick a product meant for metal surfaces. Check out the Rust-Oleum and Krylon brands because they offer excellent results with durable, smooth, tarnish-resistant finishes. You should consider buying spray paints that say “metal primer and paint in one” or have a metallic finish for a sleek look. Remember to check if the paint suits brass and ensures long-lasting coverage. Proper cleaning and priming preparation of the brass surface will yield much better results.
Which Spray Paint in Your Desired Color Works Best?
While looking for the best-sprayed color for brass, I recommend options that are of high quality and easy to work with. With many people making recommendations, Rust-Oleum Metallic Spray Paint has stood out the most with its durable finish, making it preferred for projects concerning brass. Krylon ColorMaster has a wide range of smooth-applying colors, which makes it ideal for bold or delicate looks, as one might require. Lastly, Valspar Premium Enamel Spray Paint offers excellent coverage and is a great alternative featuring an eye-catching selection of stunning colors. Ultimately, it comes down to the type of finish preferred and the details the project aims to achieve.
Does Acrylic Paint Work on Brass?
Acrylic paint can be applied to brass surfaces after doing the necessary prep work, as it will not adhere without some surface preparation. The brass should be cleaned of all contaminants like dirt, grease, and oxidation, possibly using a degreaser or soap-and-water solution. After this, sanding with fine-grained sandpaper (220-400 grit) can be used to roughen the surface to help with paint adhesion slightly. A proper primer intended for metals or bond primer should also be used to improve adhesion and reduce the chances of paint flaking.
Use high-grade acrylic paint manufactured explicitly on metals or with multi-surface acrylic labels for best results. A smoother finish that lasts longer can be achieved by applying the paint in thin, even, and well-spaced coats and allowing them to dry according to the manufacturer’s recommendations. A protective clear topcoat applied over the painted brass can prolong the paint’s lifespan, improving its durability while combatting wear and tear.
How do you apply an even coat of spray paint?
To apply an even coat of spray paint, I follow these steps for the best results:
- Preparation: Ensure the area intended for spray painting is clean, dry, and adequately primed. Removing any underlying dirt, rust, grease, or dust is critical.
- Shake the Can: Spraying the can with two to three deciliters of spray paint will ensure thorough mixing and create optimal conditions for spraying.
- Maintain Proper Distance: Holding the can at a distance of 8–12 inches enables an even spray. That distance avoids excessive paint build-up or drips.
- Use Steady, Sweeping Motions: I spray in smooth, horizontal or vertical passes, each stroke slightly overlaps the previous one for uniform coverage.
- Apply Thin Coats: Rather than one thick coat, I apply two to three thin coats, and in between, I let it dry for the recommended time, usually 15 to 30 minutes.
- Environmental Factors: I ensure that the area is well-ventilated and dust-free. The ideal temperature is between 60-80°F (16-27°C), with low humidity for optimal adhesion and drying.
Following these steps allows me to achieve a long-lasting, professional-looking finish.
How to Protect Painted Brass?

When protecting painted brass, ensure the paint is cured before wear and stress to the component. To protect against wear, use a sealant or clear coat top layer specially made for metal surfaces. Use a soft, damp cloth to remove dirt and other residues regularly. Avoid brash tools and chemicals that can scratch the paint. Most importantly, store the item in a controlled environment to maintain low moisture levels, where exposure may lead to tarnishing or peeling over time.
Should You Apply a Clear Coat?
Absolutely. In addition to a clear coat, I would suggest a top coat if the metal is expected to encounter wear and tear and harsh conditions. Using a protective layer enhances the durability, maintenance of the paint, and scratch-resistant properties. It dramatically helps metal surfaces due to the reduced chances of peeling, tarnishing, and exposure to moisture damage. Choose a metal top coat for effective and long-lasting protection for best results.
How to Prevent Paint from Chipping?
Here is how you can prevent paint from chipping:
- Proper Surface Preparation
Clean the surface to remove dust, grease, or rust. It needs to be completely dry before being painted. Sand lightly using fine-grit sandpaper (180-220) to help the paint stick better. It is also essential to use a rust converter for metals that can get rusty.
- Use a High-Quality Primer
A primer should be applied before painting on any surface. Pick one that works for the surface type, such as metal, wood, or plastic. Using an adhesion-creating primer would also make smooth surfaces last longer.
- Select Durable Paint
Pick paints made for specific materials and places. For instance, interior paints will not last on exteriors, and heat-resistant paints should be used in areas exposed to high temperatures.
- Apply Paint Correctly
Instead of thick, even strokes, try using a thin coat of paint and adding several layers. Ensure the paint is completely dried before adding additional coats. When using oil-based paints, a 4—to 6-hour curing time is recommended, while water-based paints need 1—2 hours.
- Use a Clear Protective Topcoat
After your paint has cured, add a clear protective topcoat. For outdoor and metal surfaces, look for UV-resistant and moisture-proof features. Polyurethane and epoxy are both suitable choices.
- Control Environmental Factors
Don’t paint in extreme temperatures or humidity, as these factors can impact paint adhesion. Optimal conditions are between 50-85°F (10 and 29°C), and ideal humidity is below 50%.
- Regular Maintenance
Use a damp cloth to thoroughly and gently clean painted surfaces. Avoid using abrasive cleaning materials, as these can scratch the paint. Repeatedly fix minor damages as they occur to prevent further harm.
These tips will help reduce the chances of chipping while improving the lifespan and overall appearance of your painted surfaces.
How to Maintain the Finish on Painted Brass?
To keep painted brass in good condition, I routinely clean it with a damp, soft cloth so that no harsh cleaners are used that might scratch the finish. If any chips or scratches are noticed, I minimize peeling or exposing the surface by making easy touch-ups with matching paint. I also periodically clear acrylic coats or wax polish to further protect the surface, enhance durability, and protect the painted surface. Keeping the item away from high humidity areas, extreme temperatures, or direct sunlight is essential as they could degrade the paint over time.
Aspects for Proper Maintenance:
- Cleaning: Do not use a solution with a pH lower than six or higher than eight; instead, use a soft microfiber cloth.
- Touch-Up Paint – Use paints with similar chemistry and finish, such as acrylics for painted brass.
- Environmental Conditions – Display and store painted brass in low humidity (<50%), 50-85 °F (10-29 °C) locations.
- Topcoat Application—Use a polyurethane-based clear coat as a protective top layer, as it is non-yellowing and weather-resistant.
Common Mistakes When Painting Brass

- Skipping Surface Preparation – If the brass surface is not cleaned and appropriately sanded, the paint may not adhere correctly, resulting in peeling or flaking.
- Using the Wrong Primer—Paint adhesion and finishing may be poorly executed without a metal or brass primer.
- Choosing Unsuitable Paint—Using non-specialty formulations for paints designed for metal surfaces can lead to cracking, chipping, and discoloration.
- Ignoring Environmental Conditions – Paint application in high humidity or extreme temperatures can adversely affect the drying or curing process, which may impair the result.
- Applying Thick Coats—Thick layers of paint cause drips and uneven textures that take longer to dry. For the best results, thin, even coats should always be used.
- Neglecting a Topcoat—Paint without a topcoat can easily be scratched and worn away. A top protective coat should be applied if the brass is exposed to harsh environmental conditions.
Why Won’t the Paint Stick to the Surface?
Various factors can account for why paint fails to adhere to surfaces. To begin with, if the surface is dirty, oily, or dusty, it may not allow paint to stick. It is mandatory to clean and degrease the surface before painting. Moreover, rough sanding, or failing to use an appropriate primer, can hinder paint adhesion, especially on smooth or non-porous surfaces like brass. Furthermore, environmental humidity and temperature can negatively affect the paint. Using the correct materials and carefully pre-treating the surface will help ensure proper adhesion.
How to Fix Uneven Coats of Paint?
An unequal application of paint, also termed unequal layering, can be fixed through the following steps:
- Assess the Surface—Here, one determines the specific regions with a lack of consistent application. Usually, these patches stem from a lack of proper application or work done on the surface, even before paint is put on.
- Sand the Surface—Fine sandpaper (220-grit) is recommended for the rest of the work. The correct technique is to apply gentle circular motions to blend uneven patches with surrounding areas. Clean any dust that remains on the surface with a water cloth.
- Apply a Primer Where Necessary—If areas with exposed surfaces have already been unevenly painted, apply a suitable primer. Priming enhances adhesion and reduces peeling, providing a uniform surface for repainting.
- Repaint with Thin Coats – Using a good brush or a roller, apply even thin coats of paint. Wait for each coat to dry completely (follow the manufacturer’s drying time, which is at least 2 to 4 hours and may be longer depending on the type of paint) before proceeding to the next coat.
- Feather the Edges—Blend the new paint into the existing paint surface to avoid sharp edges while feathering the borders. This will help create a seamless transition between newly applied and old paint.
- Inspect the Light Source—At times, coverage may be affected by how the space is lit. Ensure that all angles of the painted surface, both under direct and soft ambient light, are visually inspected for even coverage.
These techniques ensure even paint coats when combined with quality materials, producing a professional, smooth finish.
What to Do if Paint Peels Off?
If I see paint flaking, I first look for a possible reason, like moisture, inadequate surface prep, or mismatched paint types. My process begins with scraping or sanding the paint to a level where no loose paint remains. After that, I wash the wall section so that it is free of dirt and dust; then let it dry thoroughly. For peeling concerns, I resolve any leaks or improve airflow to reduce the risk of peeling.
Before the repainting process starts, I put a high-quality primer appropriate for the surface and an oil-based or stain-blocking primer for some areas. After the primer has adequately dried, I put no less than two even coats of premium paint, ensuring every coat is dried according to the manufacturer’s guidelines, i.e., it is dried for 2-4 hours between coats if it is latex paint). For latex paint, and to attain the best results, it is essential to apply the primer and paint in cover in conditions devoid of a temperature range of 50°F to 85°F with a humidity lower than 60%.
References
Frequently Asked Questions (FAQ)
Q: How do I prepare the metal surface for painting over brass?
A: First, prepare the surface by removing tarnish and scuffing the brass. Use steel wool or sandpaper to create a rough surface so the paint can adhere properly. Then, clean the surface with water to remove any residue and dry it with a lint-free cloth.
Q: Can I paint over brass lighting fixtures without removing them?
A: Yes, you can paint brass lighting fixtures without removing them. However, cover any areas you don’t want to paint with painter’s tape and protect the surrounding area from overspray. Hold the spray paint can about 15-20 centimeters away from the surface for an even coat.
Q: What primer should I use on brass objects before painting?
A: You should use a spray primer specifically designed for metal surfaces. Apply a thin coat of primer evenly to the surface, allowing it to dry according to the manufacturer’s instructions before applying paint.
Q: How many coats of spray paint should I apply to brass?
A: First, apply a light coat of spray paint and let it dry completely. Then, use a second coat for better coverage and a more durable finish. Ensure even application by holding the spray can consistently and moving it smoothly across the surface.
Q: Can a magnet determine if an object is brass?
A: A magnet can help determine if an object is made of brass or metal. Brass is not magnetic, so if a magnet sticks to the object, it is likely made of a different material or has a brass plating over a magnetic metal.
Q: How do I remove old brass paint to refinish it?
A: To remove the paint from old brass, use a paint stripper according to the manufacturer’s instructions. After stripping, rub the surface gently with steel wool to remove any remaining paint, and rinse with water to remove all residues. Dry the item thoroughly before refinishing.
Q: Is it possible to paint small items like brass knobs and decorative accents?
A: Yes, small items such as brass knobs and decorative accents can be painted. Use a drying rack to hold the items in place and ensure even coverage. Be sure to apply a coat of primer first for better adhesion.
Q: What should I do if the paint does not adhere properly to the brass surface?
A: If the paint does not adhere properly, it is likely due to insufficient surface preparation. Prepare the surface by removing any tarnish and creating a rough surface with steel wool. Ensure the surface is clean and dry before applying primer and paint.
Q: Can I achieve an antique look with spray paint on brass?
A: Select a spray paint color that mimics the desired antique finish to achieve an antique look. Apply the paint in layers, allowing each to dry before applying the next. You can also use staining techniques for additional effects.


