The hardness and toughness of stainless steel and its propensity to work harden during cutting create difficulties in stainless steel machining. Nevertheless, engaging with more sophisticated advanced milling methods is vital for developing highly accurate components required by the aerospace, medical, and automotive sectors. This blog post will detail the steps needed to master stainless steel machining by choosing the correct tools, cutting fluids, and applying effective machining methods. Readers will discover strategies for improving efficiency, extending tool life, optimizing surface finish, and ensuring the dependability of the manufacturing processes.
Which Milling Tools and Techniques Work Best for Stainless Steel Parts?
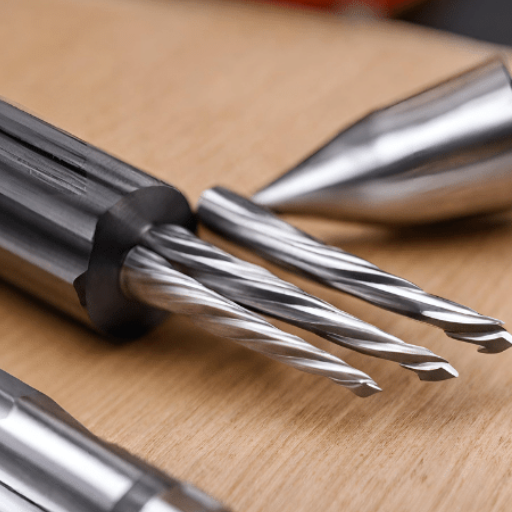
Using carbide tools and high-speed steel tools, which have a coating of titanium nitride (TiN) or titanium aluminum nitride (TiAlN), is the first step for me when planning the machining of a stainless steel component. Coatings such as these for the substrate (i.e., the underlying material) help resist excessive heat and wear, which increases the tool’s lifespan when subjected to high-stress conditions. To ensure maximum efficiency, I opt for tools with specialized geometries explicitly meant for stainless steel, as these features work in my favor by lowering the cutting forces required.
Selecting the Right Cutting Tool Materials for Stainless Steel
The most critical phase when working with stainless steel will be selecting tools and techniques because they significantly impact quality and efficiency. Carbide end mills, for example, can be helpful because of their unmatched durability and wear resistance. Further, tools with titanium aluminum nitride (TiAlN) coating or other coatings will restrict heat accumulation, increasing tool life and delaying wear. Lowering the speeds and increasing the feed rates will allow overcoming work hardening. Additionally, employing adequate cutting fluids improves surface finishes and helps cool down the tool. Climb milling is often preferred because it improves the evacuation of chips and lowers tool vibration while providing a smoother finish and precision posture.
CNC Machining Parameters for Optimal Surface Finish
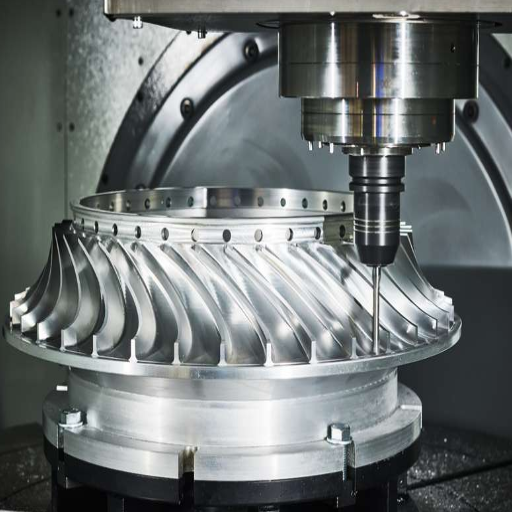
To achieve a perfect surface finish in CNC machining, one must be precise in selecting and adjusting the surface machining processes. The most critical ones are the cutting speed, feed rate, depth of cut, and tool selection. Guidelines that enhance surface quality include the following:
- Cutting Speed (Spindle Speed):
Generally, the higher the cutting speed, the better the surface finish, owing to less built-up edge formation. Depending on the material grade and tooling, a 60-120 m/min cutting speed is recommended for stainless steel.
- Feed Rate:
Lower feed rates generally enhance the surface finish due to vibration and tool mark reductions. The preferred value for machining stainless steel is between 0.05 and 0.2 mm/rev, depending on tool geometry and workpiece requirements.
- Depth of Cut:
For finishing passes, shallower depths of cuts, around 0.25 to 0.5 mm, are more favorable to decreasing tool deflection and improving surface quality.
- Tool Material and Coating:
For enhanced heat resistance and longevity, use carbide tools with appropriate coatings, such as titanium aluminum nitride (TiAlN) or diamond-like carbon (DLC). These coatings reduce surface friction and improve the surface finish.
- Coolant and Lubrication:
Applying high-quality coolant (flood or mist) to assist in heat generation, chip removal, and thermal deformation reduction improves the final surface finish.
- Machining Strategy and Tool Path:
The recommended step-over values during the finishing pass should not exceed 10–5% of the tool diameter to achieve better results. Also, refrain from engaging the tool in the cut during the finish milling to avoid rub impacts that decrease the surface finish quality.
- Tool Wear and Condition Monitoring:
Regular tool changes should control poor surface finish due to tool dulling. Non-roughed tool edges should be maintained to avoid excessive roughness and tearing of the material.
Systematic morphing of these parameters will result in an optimized process for different material specifics, machine capabilities, and targeted outcomes set by CNC machinists. These processes lead to high-resolution surface finishes.
Tool Wear Considerations When Milling Stainless Steel
Carbide tools, especially those high in hardness, heat resistance, and toughness, such as TiAIN or AlTiN, are essential in mitigating friction wear during the milling of stainless steel. Furthermore, stainless steel’s rigid and “work-hard” properties make tool wear a crucial consideration. As such, it is paramount that I set cutting speeds to around 200-400 SFM, depending on the alloy, with supplemental coolant or lubrication. In addition, having lower feed rates and a set flow of coolant also mitigates excessive heat generation and prolongs tool life. The prevention of workpiece damage, in addition to the mitigation of_precise wear_maximum_, is done along with regular tool monitoring and prompt insert replacement during the early stage of chipping or dullness. Following along and setting these parameters helps streamline the process to be both cost-effective and efficient when handling stainless steel.
What Surface Treatment Options Enhance Stainless Steel Parts After Milling?
Applying surface treatment techniques on stainless steel components after machining increases their appeal and functionality, including resistance against corrosion and improved durability. Various treatments can also be combined, such as in passivation, where surface contaminants are removed, improving the portion’s corrosion resistance, and electropolishing, which smoothens and brightens the surface while aiding in corrosion protection. Other applications like bead blasting or brushing may offer a specific texture or finish for aesthetic or functional needs. Regardless, all treatments guarantee the milled parts will retain their integrity while achieving the requisite performance standards.
Polishing Techniques for High-Quality Surface Finish
My decision for the best polishing technique to achieve high-precision surface finishes is entirely based on the component’s performance requirements and material properties. For instance, my first choice with stainless steel will always be electropolishing due to the smooth and reflective surface with increased corrosion resistance. When a more functional and textured finish is required, I use bead blasting as it offers uniformity. For softer aesthetic purposes, brushing is ideal as it provides an eye-catching yet durable surface. Regardless of the project, my approach is always guided by functional and design-related parameters, ensuring optimal project outcomes.
Pickling and Passivation for Improved Corrosion Resistance
Acid treatments such as pickling or passivation on stainless steel improve performance characteristics and control corrosion in aggressive environments. In pickling, surface contaminants, including oxides, rust, and weld discoloration, are stripped off by soaking the metal in the acid bath – Richards picks either nitric or hydrofluoric acids. Therefore, pickling aims to restore the surface to a condition that refrains from compromising material integrity.
Passivation is a step that follows pickling (or might be done independently). It consists of forming an oxide layer on the metal surface to inhibit the oxidation of steel. Passivation treatment also enhances the chrome content at the surface using a nitric or citric acid solution, which improves stainless steel’s natural corrosion resistance. Due to passivation, the outer layer is resistant to oxidation and significantly enhances material service life amidst aggressive environments.
Key Aspects for Pickling and Passivation:
- Pickling Solution:
-
-
- Nitric acid ranges from 5% to 20%, and hydrofluoric acid from 1% to 8%.
- Temperature range: 20 °C to 60 °C (or 68 °F to 140 °F).
- Immersion time: 5 minutes to 30 minutes, depending on the cleanliness of the lift.
-
- Passivation Solution:
-
-
- Nitric acid concentration: 20-50% volume out of the total solution.
- Citric acid concentration (alternative): 4-10% by weight.
- Temperature range during passivation: stay within 25°C to 60°C (77F – 140F).
- Treatment time: 20 minutes to 2 hours for optimal passive layer formation. This is the time frame in which the layer will be most stable per the goals of its intended purpose.
-
- Surface Finish Requirements:
-
-
- Proper cleaning dramatically improves the chemical processes involved. Oils and greases must be completely removed because they can affect the surface preparation treatments responsible for surface cleanliness.
- Optimal confinement for surface roughness (Ra) and micro-oxide variation variance should be set to 0.8 µm to minimize potential surface pitting or irregular uniform oxidation phenomena.
-
Both processes are essential to the marine, chemical processing, and medical equipment industries, which are continuously exposed to corrosive fluids. Pickling and passivation treatments in these industries must be correctly performed to protect the material’s functionality and dependability. Technical regulations must be strictly adhered to for these parameters and measures and their corresponding outputs.
Specialty Finishes for Automotive and Food Processing Applications
Specialty finishes are paramount to the food and automotive industries and feature novel standards regarding robustness and cleanliness. In the automotive realm, electroplating, anodizing, and powder coating boost corrosion resistance, cosmetics value, and mechanical properties. Surfaces of the equipment intended for food processing demand more stringent standards, so features such as electropolishing and passivation are used. Contamination risks aside, these standards promote ease of cleaning.
Aspects for Automotive Applications:
- Electroplating: The standard thickness will range between 0.0001 and 0.0005 inches, depending on whether the metal is chromium or nickel.
- Powder Coating: Curing is done between 350°F and 400°F to ensure adhesion and improve finish durability.
- Anodizing: Wear-resistant hard coat anodizing is typically between 25–50 microns thick.
Aspects for Food Processing Applications:
- Electropolishing: Cleanliness is maximized with surface roughness (Ra) reduced to ≤ 0.4 microns.
- Passivation: Appropriate acid concentrations must be followed with standards A967 or A380 through citric or nitric acid.
By observing these guidelines, both industries can apply finishes that are functionally usable and compliant with legal criteria, enabling prolonged use and product safety.
How Do Different Types of Stainless Steel Respond to Precision Milling?

The response of different grades of stainless steel to precision milling differs based on their hardness and composition. Austenitic grades like 304 and 316 are popular because of their workability and corrosion resistance, but these alloys tend to work harden, causing them to require slow cutting speeds and sharp tools. Martensitic grades are easily machinable due to their hardness and strength but may need cutting fluids to control heat and avoid premature tool wear from abrasion. Ferritic grades are softer and easier to machine but offer lower strength than austenitic grades. The dual-phase structure of duplex grades provides high strength and resistance to corrosion, but their toughness makes them challenging to work with, necessitating tight control over the tools and processes used. All of them require optimally adjusted conditions to ensure efficiency in cutting processes.
Machining 316 Stainless Steel for Critical Applications
Stainless steels are categorized into different types based on their material structure; a well-known one is 316 stainless steel. When I deal with this specific type, the best approach would be to use cutting blades made out of carbide or coated carbides since they are uniquely designed to withstand wear and tear while also effortlessly machining the material. Furthermore, I ensure that sharp cutting edges on the tool or machine head rotate slowly and move forward with a preset, consistent rate. This limits the heat generated, making it easier to work with the material. Carbide tools also elongate the lifespan of medical devices and machines, which further cements my notion of their usefulness.
Duplex Stainless Steel Milling Challenges and Solutions
I’ve dealt with duplex stainless steel before, specifically duplex 2205. I’ve noticed that this specific duplex exhibits exceptionally high overall strength, toughness, and low thermal conductivity. While fundamentally sound, these characteristics limit the force one can apply during machining. However, when correctly addressed, exploitation of these strengths becomes extremely easy but comes with its own set of challenges:
- Cutting Tools Selection
First, select the right tools. For this task, I recommend using either carbide or coated carbide tooling with a positive rake. These tools are crafted to perform exquisitely on stainless steel.
- Cutting Speed and Feed Rate
-
-
- Cutting Speed: Whenever possible, maintain a cutting speed between 50 and 120 meters per minute (m/min) according to the duplex grade, type of tool material, and grade of the tool being used. Cuts at higher speeds generate massive amounts of heat, leading to unsightly surface finishes and thermal damage.
- Feed Rate: In frame sizing, I prefer a constant value of 0.1-0.3 millimeters per tooth (mm/tooth). This helps with the efficient removal of chips and avoids additional heating or friction.
-
- Coolant Utilization
Coolants are instrumental in controlling heat and increasing the life of the tool. Use emulsion-based coolants or high-pressure cutting fluids to ensure no overheating and consistent cutting. Consistent coolant application also improves surface quality, as thermal softening is avoided.
- Machining Depth and Passes
-
-
- Depth of Cut: Avoid excessive depth – usually within 1-3 millimeters per pass. This is done to balance the cutting forces and tool overload.
- Climb Milling: There are several advantages associated with climbing milling. Try using it as often as possible to see a reduction in tool deflection, work hardening, and cutting-edge wear.
-
- Tool Path Strategy and Machine Stability
Adopt slow and stable tool paths to reduce vibrations and improve accuracy. A rigid machine setup significantly reduces tool chatter, making duplex stainless steel more straightforward and improving surface finish and dimensional accuracy.
Through careful adherence to these steps and changes to monitoring procedures in real-time, most, if not all, of the difficulties encountered while milling duplex stainless steel materials can be alleviated, providing superior results and increased tool life.
Ferritic Stainless Steel Machining Best Practices
When machining ferritic stainless steel, my focus is on work hardening and overall tool life. I tend to operate at slower cutting speeds – 50 to 150 SFM – which significantly aids in reducing heat generation. This, combined with moderate feed rates and sharp high-class carbide or coated tools, guarantees effortless material removal without excessive spending. An ample amount of coolant should be utilized to control heat and thermal expansion, which spurs more excellent dimensional stability and surface quality. Moreover, I do not sustain prolonged engagement with the tool or re-cutting chips using appropriate chip-breaking techniques and some self-designed rake angle modifications. These factors help in achieving accuracy in terms of machining ferritic stainless steel.
What Are the Most Common Mistakes When Milling Stainless Steel Products?

Some common errors when working on stainless steel products include incorrect cutting speeds and feeds, which may lead to excessive wear, overheating, and tool stress. Other mistakes stem from incorrect cutting tools or tool materials that do not meet the required performance standards and result in poor surface finishes. Not using sufficient amounts of coolant and lubricant is a standard error, which results in thermal distortion and overheating. During machining, undue consideration is taken to work hardening properties, and neglecting efficient chip removal strategies can exacerbate precision and efficiency concerns. Finally, inadequate machine rigidity and improper mounting can cause vibrations and errors with target dimensions.
Avoiding Tool Breakage and Workpiece Damage
To mitigate the risk of the workpiece and tool damage, I ensure that the cutting tools selected are appropriate and that the materials used align with the intended machining process. Regardless of the tool used, I make it a point to possess tools that are sharp and free of damage, which improves performance and prevents overexertion of forces on both the tool and workpiece. Workpieces and equipment undergo strain during operations caused by various forces, and I ensure that suitable feed rates, speeds, and cutting parameters are utilized to reduce mechanical and thermal stress. Controlling heat build-up to maintain stable dimensions is done through adequate coolant and lubrication application, which I prioritize. Most importantly, I focus on controlling rigid structure, precise setup, and material properties like work hardening to achieve optimal results and reduce error margins.
Preventing Surface Defects in Finished Stainless Steel Parts
Caring for surface issues in stainless steel components ready for use is an inspection in all polishing work processes. The first step is paying attention to prior cleaning, preparation, and destruction of the machine’s workpiece since all contaminants result in defects. In terms of machining, the choice of a tool that is used, the material of the tool, and the advanced manufacturing techniques of tool setting and control in a system with the aid of complex mechanical devices all contribute towards avoiding surface defects and irregularities. The use of appropriate coolant and lubrication will prevent overheating and noiselessly minimize the wear of the tool, which will result in scratches and blemish defects. Moreover, I pay attention to vibrations or instability in the industrial system and ensure that the equipment is maintained regularly to achieve accuracy and repeatability in the work done. In addition, polishing and passivation are some of the post-machined steps my client requested, which involve removing lingering surface defects and scrapping the polish leftovers, making the part more resistant to wear and lasting longer.
Troubleshooting Poor Dimensional Accuracy Issues
To resolve complications regarding the accuracy of dimensions, I first check the machine calibration, as Amontoso said a Metrics Guide should tell. All parameters must be set to the required tolerances. Any deviation of this nature is mainly caused by misalignment or improper calibration. Therefore, I attempt to check whether all axis settings and zero points are correct. After that, I move on to check the tools used for cutting to determine whether or not they are worn out. Maintenance of tools can likewise lead to imprecision, so tool replacement and re-sharpening may be required. Another element that cannot be overlooked is the material’s thermal expansion. Therefore, I make sure that environmental conditions are stable in addition to settled compensating factors that are specific to the material, especially for metals such as aluminum or steel. Critical components here include keeping the tolerances defined as ±0.001 inches, the rate of rotation of the spindle for a specific material (aluminum, for example, 3000-8000 RPM), and the speed of cutting, which, if too high, results in excessive force on the cutter, such as 0.002-0.005 inches per tooth. All of these factors are routinely observed to reduce dimensional concerns significantly.
Which Advanced Machining Services Offer Alternatives to Traditional Milling?
A number of sophisticated machining services expand beyond traditional milling. These include Electrical Discharge Machining (EDM), which employs electrical sparks to cut even the most complex materials, and Laser Cutting, which is known for producing highly accurate cuts with little waste. Waterjet Machining is an excellent clipping technique that uses high-pressure streams of water mixed with abrasives to cut components consisting of metals, composites, and ceramics. CNC Turning is noted for high-precision machining of cylindrical parts as well. These advanced methods not only broaden the range of what can be done with a machine but also aid in solving perplexing problems involving intricate shapes and complex materials.
Waterjet Cutting for Complex Stainless Steel Sheet Processing
I find waterjet cutting especially favorable when dealing with complex designs on stainless steel sheets because of its accuracy. Unlike other methods, I have seen and read that the mechanical processes used do not weaken the material because of the lack of heat. This highly versatile technique can tackle various thicknesses whilst providing accurate cuts, thus reducing material wastage. Furthermore, it is efficient for mass production and prototypes alike since the edges produced are so clean there is a reduced need for additional finishing, Work done with stainless steel cuts by plasma and laser suffer from constant inconsistency, but waterjet cutting maintains precision throughout all levels of reflectivity.
Combining Milling with Other Manufacturing Processes
Integrating milling with other manufacturing processes improves production efficacy, application scope, and precision. For example, CNC Turning centers frequently combine turning and milling processes into one machine to create complex shapes in a single setup. Such methods reduce material handling and improve accuracy, which benefits industries like automotive and aerospace manufacturing.
Another more advanced combination includes the integration of 3D printing and milling. Components created using additive manufacturing (3D printing) are transformed into near-net-shape parts, and later precision milled to enhance the surface finish, achieve tighter tolerances, or both. This method facilitates enhanced control over advanced materials, especially when intricate and complex designs require precise features.
These integrations rely on many considerations. For example:
- Milling Cutting Speed (Vc) varies with the material and tool from 100 to 1000 m/min.
- The feed Rate Value (f) for precision features must be changed to 0.01-0.1 mm/tooth.
- Spindle Speed (n) is defined as ( n = \frac{1000 \cdot Vc}{\pi \cdot D} ), where D is tool diameter, and n is the spindle speed, which defines optimum cutting conditions.
- In other integrated processes, such as additive manufacturing and milling, vertical and horizontal alignment must be controlled to preserve the integrity of the design and the dimensional tolerance of ±0.01.
With more advanced approaches, manufacturers can continuously improve with modern techniques and maintain the industry standard for quality and precision by using the best aspects of each methodology.
When to Use High-Pressure Water Techniques versus Conventional Machining
High-pressure water techniques are ideal for use with materials that would be harmed by heat, such as composites, plastics, or thin metals. This method avoids thermal distortion, allowing for maintaining details on the delicate or heat-sensitive material. On the other hand, more rigid materials like steel or titanium can be machined with more detail on deeply detailed cuts using conventional machining. This type of machining works much better with tighter tolerances than intricate, thin detailing work.
For high-pressure water techniques, fundamental parameters are a range in water pressure from 20,000 to 60,000 psi and a tolerance of ±0.1 mm depending on the type of material and its thickness. Conventional machining also excels at performing spindle speeds of 500 to 10,000 RPM and can withstand tolerances as low as ±0.01 mm. These two options provide a wider selection based on material properties, needed precision geometry, and other project specifics.
References
Frequently Asked Questions (FAQ)
Q: What are the key challenges in the machining process of stainless steel products?
A: The machining process of stainless steel products presents several challenges due to the material’s inherent properties. Stainless steel alloy tends to work hard during cutting operations, which increases cutting forces and tool wear. It also has lower thermal conductivity than carbon steel, causing heat buildup at the cutting edge. The material’s high ductility can also lead to built-up edge formation and poor chip breaking. To overcome these challenges, proper cutting parameters, adequate cooling, rigid machine setups, and selecting the right tool for specific stainless steel grades (such as 304 stainless steel) are essential for successful machining.
Q: How does work hardening affect the milling of stainless steel?
A: Work hardening significantly impacts stainless steel milling operations. When you cut stainless steel, the material hardens in response to the cutting forces, making subsequent cuts more difficult. This phenomenon occurs because plastic deformation causes the crystalline structure of the steel alloy to change, increasing its hardness and strength. Machinists should maintain consistent cutting engagement, use sharp cutting tools, employ climb milling techniques, and ensure proper feed rates to minimize work hardening effects. Without these precautions, tool life decreases dramatically, and the quality of stainless steel pieces deteriorates.
Q: What is the best stainless steel grade for precision milled parts?
A: Austenitic grades like 304 stainless steel and 316 are among the best stainless steel options for precision milled parts. These grades offer excellent corrosion resistance and good machinability with the proper techniques. For improved machinability, free-machining grades like 303 (which contains sulfur) make stainless steel more straightforward to process while maintaining reasonable corrosion resistance. For higher-strength applications, precipitation-hardening stainless steels such as 17-4 PH offer excellent dimensional stability after heat treatment. The optimal choice depends on the specific application requirements, including corrosion environment, mechanical properties needed, and post-processing operations.
Q: How does heat treatment affect machined stainless steel components?
A: Heat treatment significantly influences the properties of stainless steel machined components. For martensitic stainless steels, heat treatment can harden the material, increasing strength and wear resistance but potentially causing dimensional changes that must be accounted for in precision parts. Annealing can relieve internal stresses created during machining, improving dimensional stability. Solution annealing of austenitic stainless steel dissolves carbides and restores corrosion resistance that might have been compromised during machining. The steel’s recrystallization temperature is critical in determining appropriate heat treatment parameters. Proper heat treatment scheduling—whether performed before, during, or after machining—is essential for achieving desired mechanical properties while maintaining dimensional accuracy.
Q: What are the right tools to use when milling stainless steel?
A: When milling stainless steel, the right tool selection is crucial for success. Carbide cutting tools with TiAlN or AlCrN coatings provide the wear resistance and heat dissipation needed for stainless steel machining. Tool geometries should feature positive rake angles to reduce cutting forces and minimize work hardening. Tools with variable pitch and helix angles reduce vibration and improve surface finish for high-speed machining. When performing roughing operations, tools with chip breakers help manage the stringy chips typical of stainless steel. Finishing operations benefit from multi-flute end mills with a light depth of cuts. The specific tool selection should match the machined stainless steel grade, as different grades (cast steel vs. rolled stainless steel) respond differently to machining forces.
Q: What cooling strategies are most effective for processing stainless steel?
A: Proper cooling is essential for effectively processing stainless steel to combat heat buildup and prevent work hardening. High-pressure coolant directed at the cutting interface is highly effective, mainly when delivered through the tool. Oil-based coolants often outperform water-based options for stainless steel milling, providing better lubrication and reducing friction and heat generation. Cryogenic cooling using liquid nitrogen or CO2 shows excellent results for difficult-to-machine stainless steel grades by keeping temperatures below the material’s work-hardening threshold. Minimum Quantity Lubrication (MQL) can be adequate for lighter cuts while being more environmentally friendly. Consistent coolant application is critical in all cases—interruptions in coolant flow can cause thermal shock, leading to premature tool failure and poor surface finish.
Q: How can you optimize cutting parameters when you cut stainless steel?
A: Optimizing cutting parameters when you cut stainless steel is essential for efficiency and quality. Start with cutting speeds 50-60% lower than those used for mild steel, typically 100-150 SFM for austenitic stainless steels with carbide tools. Feed rates should be moderate to heavy enough to prevent rubbing and work hardening—light feeds often accelerate tool wear in stainless steel. The depth of cut should be set to stay below the work-hardened layer from previous passes, generally at least 0.020″ (0.5mm). For high-precision parts, finishing passes should use higher speeds with light depths of cut. Radial engagement should be managed carefully, with full-width slots avoided when possible. Modern machining techniques like trochoidal milling paths and high-efficiency milling (HEM) significantly improve material removal rates while extending tool life when cutting stainless steel.
Q: What surface treatment methods can be applied after milling stainless steel parts?
A: After milling, several surface treatment methods can enhance the performance and appearance of stainless steel parts. Electropolishing is particularly effective, removing a thin material layer to improve surface finish and corrosion resistance. Passivation treatments remove free iron particles and create a protective oxide layer that helps the material resist corrosion. Nitriding can be employed to improve hardness in specific grades. Mechanical finishing methods include tumbling, bead blasting, and vibratory finishing, enhancing surface uniformity. For decorative applications, processes like brushing or mirror polishing create distinctive appearances that make stainless steel widely used in consumer and architectural products. Chemical processes such as acid etching can create textured surfaces or markings. The choice of surface treatment depends on the finished component’s functional requirements and aesthetic considerations.
Q: How does the design of parts impact the successful use of stainless steel in precision milling?
A: Design considerations significantly impact your ability to use stainless steel in precision milling applications. Parts should be designed with uniform wall thicknesses to minimize distortion from internal stresses. Sharp internal corners should be avoided as they create stress concentrations and make machining more challenging—a minimum radius of at least the cutter radius is recommended. Feature orientation should account for the directional properties of rolled stainless steel sheets or bar stock. Adequate clamping surfaces should be incorporated into the design to minimize workholding-induced distortion. Design for manufacturing principles, such as minimizing deep pockets with small corner radii, helps reduce machining time and tool wear. Finally, tolerances should be specified based on achievable results for the specific stainless steel grade, as overly tight tolerances can dramatically increase production costs without functional benefits.


